This post will explain blogger HTTPS status unknown. How to shift from HTTP to HTTPS on blogger blog sites with customized domains? Or How to set up SSL on Blogger? Do you have any problems like this in your brain? It is excellent news for all those who utilize Google Blogger; now, you can enable HTTPS on a Blogger blog site with a custom domain. Making it possible for Blogger HTTPS implies your blog has an SSL certificate. Blogger SSL helps to develop a secure connection between your blog and users.
How to Enable HTTPS on A Blogger Blog Having Custom Domain?
In this article, you can know about blogger HTTPS status unknown here are the details below;
After you allow HTTPS on your blog, visitors and readers will access your blog on an HTTPS safe connection instead of HTTP. Prior to, this function was restricted to the Blogspot sub-domain just. For customized domain owners getting an SSL certificate for Blogger was a dream. Let’s Secure powers this SSL certificate.
First, you want to learn and regarding the SSL certificate. Then I’ll recognise you how to get the HTTPS Blogger custom-made domain.
What is an SSL Certificate?
SSL is a small form of Protected Socket Layer that ensures your website security. On the internet, when a user sends out personal information or does a monetary transaction, it needs to keep this personal data safe and protected. For this, we require an SSL Certificate, which makes sure personal information is encrypted in between the user device & web server and won’t be available to the 3rd individual. Discover how it works.
If a website is achieved with an SSL certificate, it has an HTTPS connection. When some site believes in having an SSL certificate or web browser unable to validate the certificate, it reveals a warning, as shown below.
Why Use An SSL Certificate/ HTTPS?
Prior to beginning application actions, you should understand a couple of advantages of using a complimentary SSL certificate (HTTPS) on a blog.

1. Google has actually revealed a website with an HTTPS connection will rank better in SERP. It suggests your blog will be ahead of rivals.
2. Your blog site will be marked as protected in the eyes of online search engine.
3. SSL certificate allows a protected connection in between your blog and visitors.
4. The blog site looks more expert.
5. Your blog site will not get the unsecured connection on Google Chrome and other browsers. It implies you will not hesitate to open your blog site. Also check How to Hide Your IP Address.
Before you make it possible for Blogger HTTPS, you should take off these things-.
— You require to submit your blog to Google Search Console once again as your new blog site URL resembles https://www.yourblog.com. Do not forget to eliminate the existing “Home” of this blog.
— You need to ensure all image URLs are beginning with HTTPS. You have to cross check all the old offices.
— All custom-made blog devices should be inspected to have SSL connections. If a third-party blog site gizmo does not have an HTTPS connection, then remove it.
— Blog site traffic may down for some days since Google will reindex it. So you should submit your blog and sitemap in Google Browse Console. Do not forget to do the equivalent for other webmaster tools such as Bing etc
Steps to Allow HTTPS on A Blogger Blog Site with Custom Domain.
1. Check in to the Blogger dashboard.
2. Select a blog site to enable HTTPS.
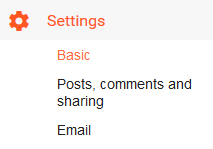
3. Go to Settings > Basic > HTTPS.
4. Go to HTTPS accessibility and choose YES from Dropdown.
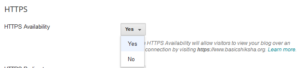
It may take a bit longer to make it possible for HTTPS. Revitalize the web page.
5. Go to HTTPS redirect & choose YES from Dropdown.
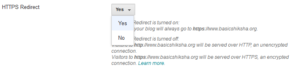
This alternative guarantees all of the visitors will view your blog on an HTTPS connection.
Congrats! You have strongly enabled Blogger HTTPS on a blog with a custom-made domain. Share your experience while executing SSL for the Blogger custom domain. Do not overlook to share your old and latest posts with brand-new HTTPS URLs.
Special Note-.
This option is not offered for all Bloggers. But you can take the aid of your pal who can enable HTTPS on his blog site if you will add him/her admin of your blog. Then he/she will be able to make it possible for HTTPS on your blog from his/her dashboard. It might take a few hours to see the option to enable HTTPS for your blog site. You should keep him/her admin continuously the “allow HTTPS” option readily available on your control panel.
Some Repairs Are Required After Making It Possible For HTTPS on Blogger.
Analyze and Repair the Mixed Material.
It is reasonable to have a mixed content concern after using an SSL certificate. Blended content means your post and pages have actually used links and images with and without HTTPS. Also check how to mod nintendo switch.
— Open your blog site on Google Chrome.
— Press Ctrl+ Shift+ J secrets to open the Javascript console tab.
— The blended content warning might like this.
” Mixed Material: The page at ‘https://yourcustomdomain.tld/’ was loaded over HTTPS, however asked for an insecure script ‘http:///script.js.’ This request has actually been blocked; the content must be served over HTTPS.”.– You go to the Google Blogger Support page to repair the errors. You need to modify your blog posts to fix the combined material cautions. Unfortunately, you are needed to do one by 1 if your blog is quite old.
Please do it for all the uploaded pictures, internal & external links. Other Essential Things.– You may need to re-upload the logo design, favicon, and other images in your blog/blog post.– You might get the combined material caution on the archive, label, and search pages. Repaired this thing with action 5d. Edit Robots.txt.– Go to Blogger > Settings > Browse Preferences.– Try to find Crawlers and indexing. Here
edit Custom-made robots.txt and include the following–.
User-agent: Mediapartners-Google. Disallow:.
User-agent: *. Disallow:/ search
Enable:/. Sitemap: https://www.yourcustomdomain.tld/sitemap.xml.
Make certain to alter your domain. Resubmit the Blog Site Sitemap to Google Browse Console. You previously sent the sitemap for a property that begins with HTTP, not HTTPS, so please cross-check and erase the old residential or commercial property & recreate a new one with HTTPS.
A Model to resubmit sitemap to Google Search Console, Bing Web Designer Tools, and Yandex.Webmaster. Your blog sitemap file handle is sitemap.xml. and can be located at the following place–. http://yourcustomdomain.tld/sitemap.xml. I think this guide is useful for you. Bloggers utilizing a custom-made domain a Blogspot blog can utilize a complimentary SSL certificate. Do not forget to receive this job with your good friends.


Add Comment