In the past when technology was not developed, people were looking for clearer picture quality, to be able to show details of the original appearance in the photo was such a luxury. But with the rapid development of photography, the situation has been very wildly different. Now in a particular photograph, the photographer will blur a particular part of the image, leaving only the main focus. This will enable people to look at the work more focused on the main content and not have too many other details of their judgment.
Making the main subject more prominent in the photo is the major reason to blur a picture. It removes all the fine details and enhances the subject. It can be even more helpful when you edit the photo to crop, overlay, or add effects. Blurring an image is not only about that. You can also use it to make a certain part of the image unrecognizable. For example, you can always see blurry license plates or human faces on the news in order to protect privacy. So, as a non-professional user, how to blur a picture on Windows for free?
Don’t worry, in this article, we will walk you through the very detailed method to take a blurry photo in the easiest way without any charge. We also included a bonus part in this post to tell you the method of how to blur a picture on Instagram, so that you can blur any photo you want on android and iPhone. Check this out.
In this article you will find out:
- How to Blur a Picture on Windows
- Using a Image Editor – WorkinTool Image Converter
- Microsoft Office
- Bonus: How to Blur a Picture on Instagram
- Conclusion
How to Blur a Picture on Windows:
I know that sometimes editing a Picture can be a pain in the gut, and image editing software is normally not very cheap and especially not worthy of a spend for unprofessional users who need it two or three times a year. Considering this kind of situation, we have specifically gathered two effective and totally free methods for Windows users to solve the problem of how to blur a picture. One is to use Microsoft Office and another method is to apply an easy third-party image editor WorkinTool Image Converter. Let’s see the details.
1) WorkinTool Image Converter
WorkinTool Image Converter is a newly published Image editing software. But don’t underestimate it just because it is new. It is already a very mature image editor. It has all the image-related features that you can see on the market and they are well enough for daily use. And it is easy to operate, simple in interface, and more suitable for people who don’t have an image editing basis. Literally, you can see it as a free version of Photoshop.
With this user-friendly image editor, you can convert image format, compress image size, and adjust all the parameters. There is even more funny effect to make your photos stand out. You are offered not just what you want to process a photo, but more what you might like in the future. Let’s dive into how to blur a picture with WorkinTool.
Feature in Use
Once you have downloaded and open it on your Windows PC, you will roughly see three sections of the editing functions on the left bar. WorkinTool has divided them into three main subjects: Image Conversion, Photo Toolbox, and Edit Picture for Fun. And the blurring feature is right in the Editing one.

- First, click on Edit Images, select and upload the photo you want to blur.
- Here you are free to adjust any parameters you want. But for the blurring part, you have to find the water-drop icon.
- You will see that WorkinTool has offered four different blurring options.
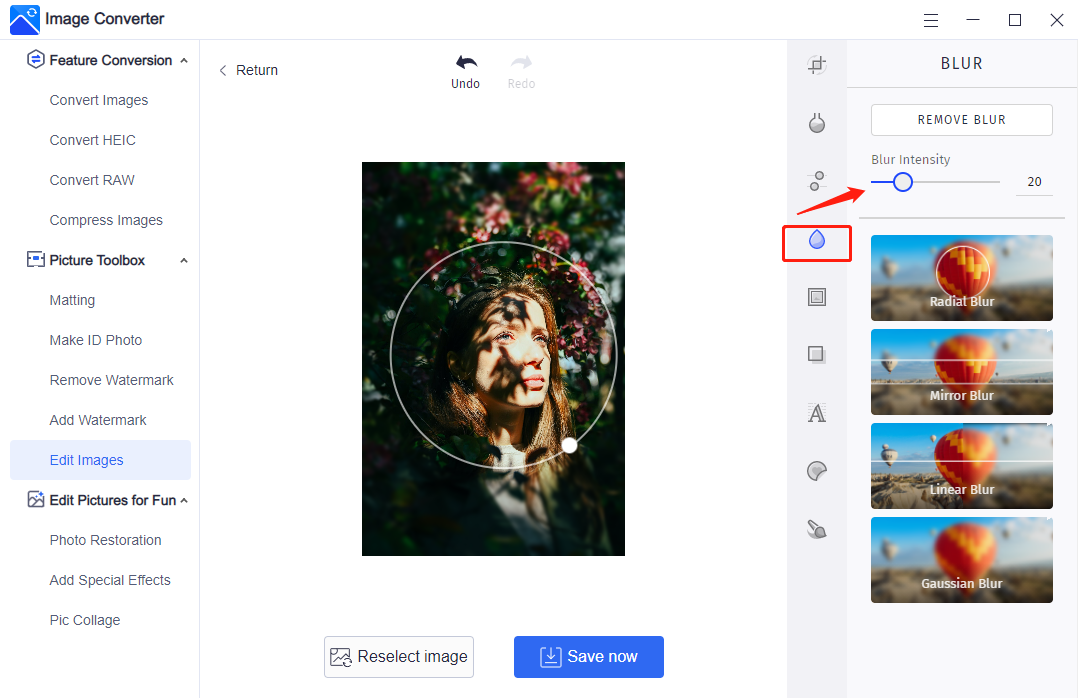
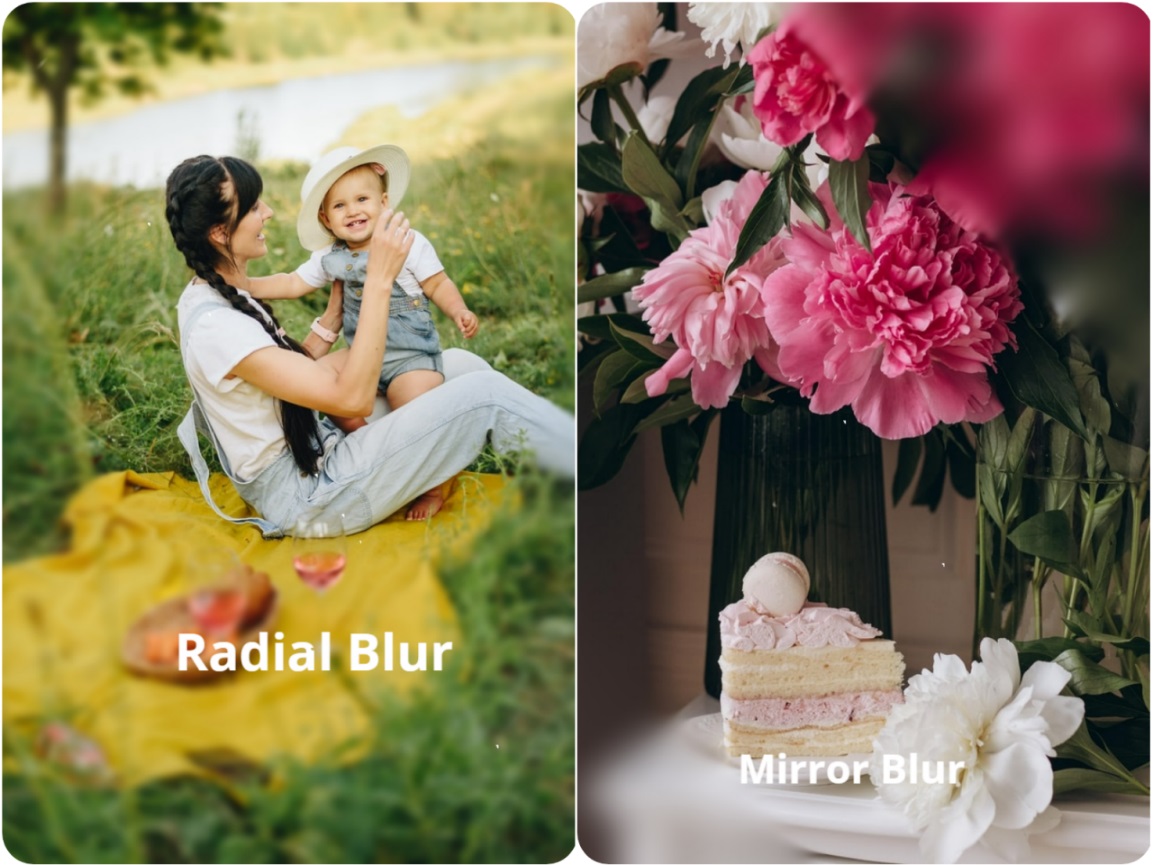
| Radial Blur | Mirror Blur | Linear Blur | Gaussian Blur |
| A gradual blurring effect that radiates outward from the center. | Divided by two lines, the middle section presents clear content, and the sides section presents a blurring effect | With a line in the middle as the division, one side for the clear side for the fuzzy effect | A blurring effect that radiates the whole image. |
Here I take Radial Blur as an example, you can feel free to select any blurring effect you want.
- Move the scope in the picture to control the extent that it needs to blur.
- Adjust the Blur Intensity from the control bar in the top right of the image, and click Remove Blur if you need to redo it.
- When you’re done click Save Now below or re-select another image to blur.
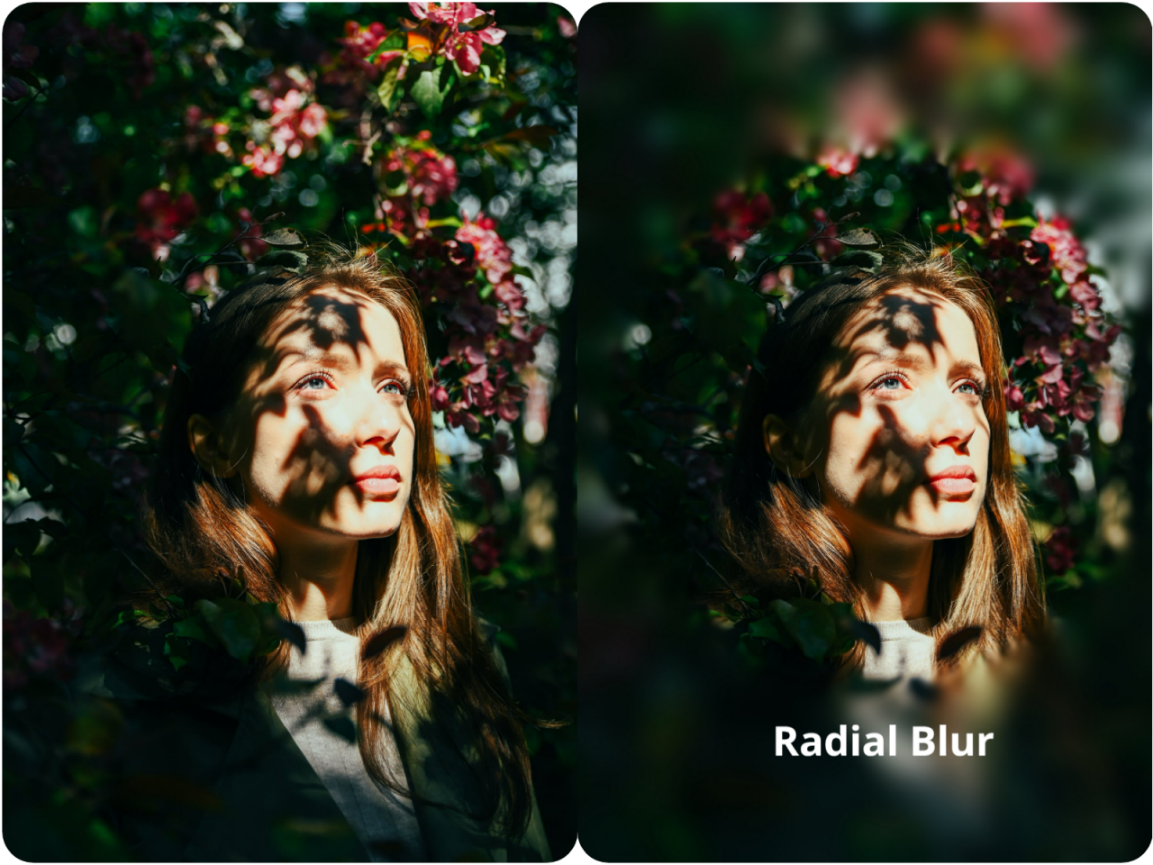
As you can see, WorkinTool gives users the photo processing experience they need through four different blurring features. And the effect can be said to be immediate. Without affecting the quality of the original picture while solving the user’s real problems.
2) Microsoft Office
If you don’t want to download any third-party software to blur your photos, I guess you are willing to give this method a try. By using Microsoft Office to solve your problem of how to blur a picture. I guess I don’t need to introduce you to what is Microsoft Office, considering it is already on the Windows system for generations. Through versions of development, the features in it only get stronger and stronger. And among them, there is a picture inserting function you can take advantage of to blur your wanted pictures.
Feature in Use

Normally when you purchase a Windows system computer, it comes with a Microsoft Office activation code. And that is why I put this method on the free list. In theory, Word and PowerPoint can be implemented in which the picture of the operation blurs. Here we take Word as an example to give you a demonstration.
- Click on Insert > Pictures to select a photo to blur.
- insert the photo on the canvas.
- Find Picture Format on the toolbar, and select Artistic Effects.
- In the list of picture options that opens, select the Blur option:

Bonus: How to Blur a Picture on Instagram
Of course, in real life, it’s easy to blur a photo on your phone and upload it to a social media platform. So let’s take a look at how to blur images on Instagram, the most popular photo-sharing social platform on earth. This method works both ways on Android and iPhone.

Feature in Use
- Open Instagram on the phone and click on the + button.
- Upload a picture that you want to blur and post.
- Select Edit next to the Filter and find Tilt Shift.
- Choose Radial or Linear and adjust the intensity to blur.
- Click on the Done button to finish editing.
Conclusion
In this post, we have concluded two free ways to help you with the issue of how to blur a picture. Both methods are very simple and effective to make it work on Windows. Plus, we have introduced you to how to blur your photos on Instagram, which is feasible both on Android and iPhone, so you don’t have to worry about problems like incompatibility. You can ensure to apply any of these methods above according to your condition. We promise that you will have a satisfactory result in the end.


Add Comment